Monitor Arm vs Stand vs Riser: Best for Small Desks
If your desk is small, shallow, or wedged into a corner of a studio apartment, every inch matters. The wrong monitor support eats up the exact desk depth you need for your keyboard, your forearms, and a coffee mug. The right one can hand you back a surprising amount of usable surface.
This is a head-to-head look at the three most common ways to hold up a screen: a monitor arm, a monitor stand, and a monitor riser. We’ll cover what each one is, roughly how much desk space it reclaims, how well it gets your screen to the right ergonomic position, what it costs in money and effort, and exactly who each one suits.
Quick definitions before we dig in, because these terms get used loosely:
- Monitor arm — a clamp- or grommet-mounted pole and articulating arm that floats your monitor in the air. The screen attaches via VESA mounting holes.
- Monitor stand — a raised platform with legs or a solid base that lifts the monitor and usually leaves a shelf or open cubby underneath.
- Monitor riser — the simplest version of a stand: a low block or shelf that nudges the screen up a few inches. Often used to store a keyboard underneath.
The line between “stand” and “riser” is blurry. In this guide, riser means low and basic; stand means taller and more featured. Your screen’s stock factory base counts as a stand too, and it’s the thing we’re usually trying to improve on.
The Real Problem: Desk Depth, Not Just Desk Width
On a small desk, the constraint that bites first is usually depth — the distance from the front edge to the wall.
Standard ergonomic guidance is to sit with the screen about an arm’s length away (roughly 20 to 30 inches for most people) and the top of the screen at or just below eye level. On a shallow desk, that arm’s-length requirement fights with the footprint of whatever is holding your monitor up.
A typical factory monitor base is roughly 8 to 10 inches deep (approximate — it varies a lot by brand and screen size). That base sits in the middle of your desk, and you can’t reclaim the space behind it for anything useful, while the space in front is too close to the screen to work in.
So the question “what saves the most desk space” really means: which option pushes the screen back toward the wall and frees up the depth in front of it?
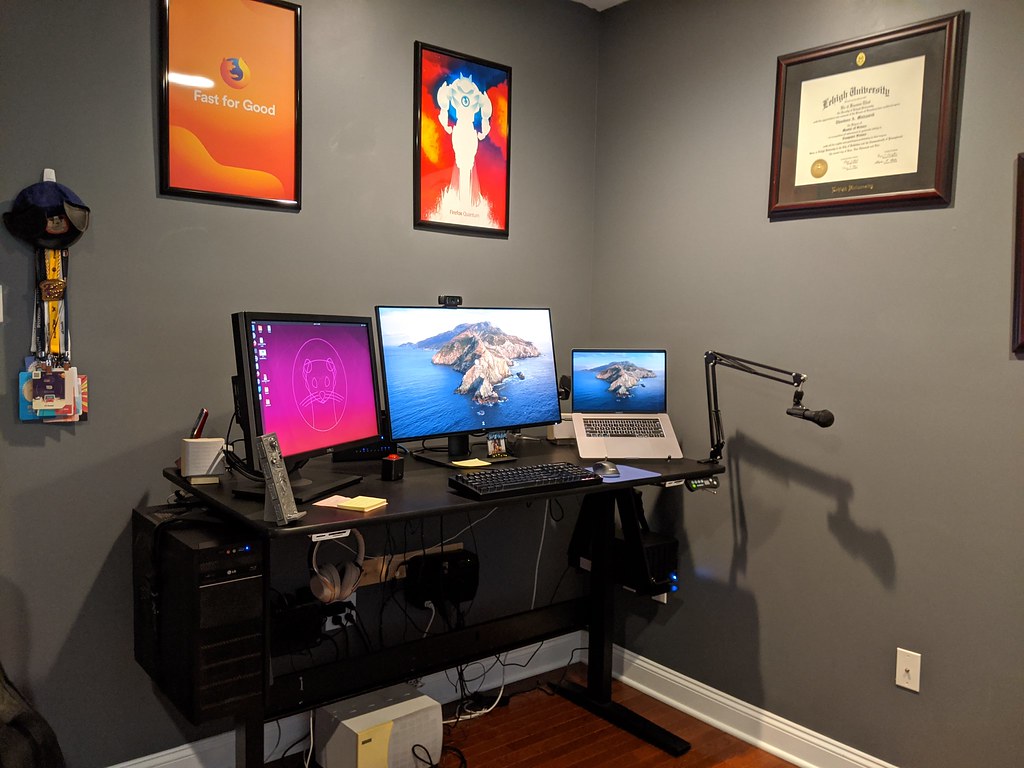
Monitor Arm: The Space-Saving Winner
A monitor arm clamps to the back edge of your desk (or mounts through a grommet hole) and holds the screen out on a jointed arm. The screen’s own base comes off entirely.
Desk space reclaimed: the most, by a clear margin.
Because the arm mounts at the very back edge and the monitor floats, you recover essentially the entire footprint the stock base used to occupy. On a small desk, that can mean reclaiming a strip roughly 8 to 10 inches deep across the width of the screen (approximate, matching the base it replaces). You can slide a keyboard, notebook, or even your forearms into that newly open zone. You can also push the screen back closer to the wall and pull it forward only when you need it.
Ergonomics: the best.
This is where arms really earn their keep. You can dial in height, depth, tilt, and swivel independently. Getting the top of the screen to eye level and the panel to a comfortable arm’s length stops being a guessing game — you just move the arm. For renters this matters because it adapts to whatever chair and desk you already own.
Cost and effort: highest of the three.
Arms cost more than a stand or riser, and they require a couple of things to be true:
- Your monitor needs VESA mounting holes on the back (most do; some thin or budget screens don’t, though VESA adapter plates exist).
- Your desk edge needs to be sturdy and the right thickness for the clamp. Glass desks and very thin or flimsy surfaces can be a problem.
- Installation takes 10 to 20 minutes and a little patience with cable routing.
Good news for renters: a clamp-mount arm leaves no holes in the wall and no holes in the desk, so it protects your security deposit. Avoid the wall-mounted style unless you own the place.
If you decide an arm is right for you, look for one rated for your screen’s size and weight, with a clamp that fits your desk thickness. monitor arm
Monitor Stand: The Balanced Middle Option
A monitor stand is a raised platform. The screen keeps its factory base and sits on top of the stand, and the gap underneath becomes storage — a spot to tuck a keyboard, charger, or small items.
Desk space reclaimed: some, but indirectly.
A stand doesn’t shrink the screen’s footprint the way an arm does. The base still sits there, and the stand’s own legs or platform take up roughly the same depth. What a stand gives you is vertical space: the cubby underneath lets you slide the keyboard partway under when you’re not typing, or store the gear that was cluttering your surface.
So the honest framing is: a stand doesn’t free up desk depth, it stacks your stuff to make the existing depth go further. On a shallow desk that can still be a real win, especially if your clutter is the problem rather than the monitor itself.
Ergonomics: decent, but fixed.
A stand reliably raises the screen, which fixes the single most common ergonomic mistake — a monitor sitting too low. Many people’s stock setups put the screen below eye level, and a stand of the right height brings the top of the screen up to where it should be.
The catch: most stands are a fixed height, so you have to buy the right one or stack books to fine-tune. They also don’t help with depth — you still position the screen by sliding the whole stand, and you can’t pull it forward and back as easily as an arm.
Cost and effort: low to moderate.
Stands are cheaper than arms and require zero installation — you set it down, put the monitor on top, done. Nothing clamps to your desk and nothing needs VESA holes. That makes them friendly for any monitor and any desk, including glass.
Monitor Riser: The Cheapest, Simplest Fix
A riser is the stripped-down stand: a low platform or block that lifts the screen a few inches and usually leaves just enough room to park a keyboard underneath.
Desk space reclaimed: modest, and mostly via the keyboard tuck.
Like a stand, a riser doesn’t remove the monitor’s base footprint. Its main space trick is letting you slide the keyboard underneath when you stand up or step away, clearing the front of the desk. The lift itself is small — often only a few inches — so don’t expect it to transform a cramped desk.
Ergonomics: limited.
A riser gives a gentle height bump. For someone whose screen is only slightly too low, that can be enough to get the top of the screen close to eye level. For a screen that’s far too low, a riser usually won’t lift it enough, and it does nothing for depth or tilt. Treat it as a small correction, not a full ergonomic fix.
Cost and effort: lowest of all.
Risers are the cheapest option, often by a wide margin, and the easiest — set it down and you’re finished. No VESA, no clamp, no tools. For a renter on a tight budget who just needs the screen a touch higher and a place to slide the keyboard, it’s a sensible, low-risk starting point.
Side-by-Side Comparison
| Monitor Arm | Monitor Stand | Monitor Riser | |
|---|---|---|---|
| Desk depth reclaimed | Most (recovers base footprint, ~8–10 in approx.) | Indirect (storage underneath) | Modest (keyboard tuck) |
| Height adjustable | Yes, freely | Usually fixed | Slight, usually fixed |
| Depth / tilt / swivel | Yes | No | No |
| Needs VESA holes | Yes | No | No |
| Needs a sturdy desk edge | Yes (clamp) | No | No |
| Install effort | Moderate (10–20 min) | None | None |
| Relative cost | Highest | Moderate | Lowest |
| Renter-friendly | Yes (clamp style, no wall holes) | Yes | Yes |
Dimensions above are approximate and vary by product, screen size, and desk.
Quick Decision Guide
Choose a monitor arm if you have a small or shallow desk and want to genuinely reclaim depth, you care about getting the screen to a precise eye-level-and-arm’s-length position, your monitor has VESA holes, and your desk edge is sturdy. It’s the best fit for serious daily work in a tight space.
Choose a monitor stand if your real problem is clutter rather than depth, you want a no-install solution that works with any monitor (including glass desks and non-VESA screens), and a fixed height bump plus a storage cubby would solve most of your pain.
Choose a monitor riser if your budget is tight, your screen is only a little too low, and you mainly want to be able to slide the keyboard out of the way. It’s the lowest-commitment, lowest-cost starting point.
Still mapping out the whole setup? See Small-Apartment Desk Setup: A Renter’s Guide and How to Set Up Your Monitor at the Right Height.
Frequently Asked Questions
Does a monitor arm really save more space than a stand?
Yes, on desk depth specifically. An arm removes the screen’s base and mounts at the back edge, recovering the footprint the base used to occupy — roughly 8 to 10 inches of depth (approximate). A stand keeps the base and adds storage underneath instead of clearing surface.
Will a monitor arm work with any monitor?
Most monitors have VESA mounting holes on the back, and arms attach to those. Some thin or budget screens lack them, but VESA adapter brackets are available for many of those. Always check your monitor’s weight and size against the arm’s rated limits.
Are monitor arms safe for rented apartments?
A clamp-mounted arm attaches to your desk, not your wall, so it leaves no holes and protects your deposit. Skip wall-mounted versions unless you own the place. Just confirm your desk edge is sturdy enough and the right thickness for the clamp.
What if I have a glass desk?
Glass and very thin or flimsy desks can be a problem for clamp-on arms — check the manufacturer’s guidance carefully. If in doubt, a stand or riser sits on top and needs no clamp, making it the safer choice.
How high should my monitor be?
As a general rule, the top of the screen should sit at or just below eye level when you’re sitting upright, with the screen about an arm’s length away (roughly 20 to 30 inches for most people). Raise or lower the screen until you can look straight ahead without tilting your head up or down.
Can I just stack books under my monitor?
For a temporary or budget fix, yes — a stable stack of books is essentially a free riser. The downsides are stability and looks, and you can’t store a keyboard underneath as cleanly. It’s a fine way to test what screen height feels right before buying anything.
The Bottom Line
If reclaiming actual desk depth on a small or shallow desk is the goal, a monitor arm wins — it removes the base, frees the most space, and dials in ergonomics precisely. It just costs more and asks for VESA holes and a solid desk edge.
A stand is the balanced pick when clutter is the real enemy and you want zero installation. A riser is the cheap, simple nudge for a screen that’s only slightly too low. Match the tool to your actual constraint — depth, clutter, or just a small height bump — and your tiny office will feel a good deal bigger.